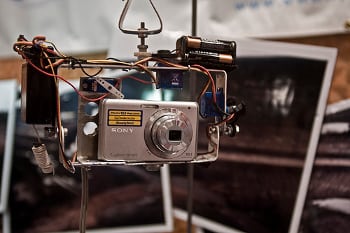
DIY aerial photography
July 4, 2011

Do-it-yourself aerial photography: A guided tour

Part One of a two-part series. See Part Two, on 3D modeling and satellite imagery, here.

You need a bird’s-eye view of your build site, but all you have is $50 and a box of mothballed electronics from your attic. Welcome to DIY aerial photography.

Looking down on your work site from afar is usually as easy as opening Google Earth. But sometimes your site is a rural Cambodian river that has not yet received the paparazzi treatment from satellites overhead. And sometimes you need more detail, or faster updates, than free sat images can provide. That’s when the fun begins. Build a rocket. Launch a balloon. Fly a toy helicopter. Then use free software to stitch your photos together or render 3D models. On a tight budget, the MacGyver spirit is strong in aerial photography.

To guide us through the toy room, we turned to Wil Cao, the architect of a series of aerial photography solutions that his team used during a build of a levy on that Cambodian river we mentioned. Cao is a structural engineer at Parsons Brinckerhoff in New York City, and a member of the New York Professionals chapter of Engineers Without Borders-USA. In late 2005, he and an EWB-USA team began a project to build a dam and levy to protect a rural Cambodian village against seasonal floods.

Cao’s recollection of the start of that project is already nostalgia tinged. “We had the sweaty t-shirts on our backs and the enthusiasm of youth to motivate us. But money and other resources were often limited, and thus, being creative with engineering ‘equivalents’ were our initial solutions,” Cao told E4C.

Kites

Over the more than four years that they worked in Cambodia, the EWB-USA team pieced together aerial maps with a grab-bag of solutions. As a foundation, they began with a blurry image from a predecessor of Google Earth. They overlaid the blur with topographic maps from the Cambodian military, and filled in holes with shots from helicopter passes, satellite photos from private firms, and a camera on a kite.

DIY aerial photography

This modified RC joystick for a toy plane controlls the camera in the kite rig. Photo credit: Rob Goodier

The trick to kite aerial photography is the camera rig. The EWB-USA team engineered a fancy, remote-controlled rig that they operated with a modified RC controller for a toy airplane. Our Solutions Library provides resources for jiggering your own rig. Not surprisingly, Instructables also presents kite-rig plans that are deeply MacGyver-esque. That rig is made from a pen, push pins, paint sticks, a VHS casette, an electric motor stripped from a toy and other oddball parts. For an equally stellar rig, see Make Magazine’s blog. And in another Make post you’ll find some pretty photos shot from a kite.

Balloons

But why stop at kites? As Cao points out, “The enthusiasm of youth has no limits. You can use a kite, a helium balloon, a rocket, and why not a remote heli or plane (if it can go high enough).”

EWB’s kites soared as high as 1300ft (400m), and balloons can fly up through the stratosphere. Amateur space explorers are using balloons to shoot video of the black of space from the edge of the atmosphere, and it doesn’t cost much. In this post, Mike Senese details his space cam project, “DIY near-space aerial photography for $150.”

For less dramatic and more detailed aerial shots, we turn to the Public Laboratory for Open Technology and Science, which used DIY aerial photography to map the BP oil spill in the Gulf of Mexico. The site provides a free mapping kit and an illustrated guide to build your own helium-balloon-lifted camera rig.

DIY aerial photography

The kite-borne camera took these photos and hundreds like them of the dam site in Cambodia. Photos courtesy of the New York Professionals chapter of EWB-USA

On some project sites, however, helium could be a luxury. In those cases, try using the sun. Instructables shows us how to make a solar-heated balloon that can carry a small payload (spoiler alert: The balloon is black). The site also provides plans for a simple, self-leveling rig for balloon and kite photography. Can’t decide between a kite and a balloon? Try the kite-balloon hybrid.

Rockets and helicopters


Another little-explored option is rocket photography. On his site, rocketryphotography.com, Doug Gerrard outlines the rockets, cameras, mounts and controllers he has used snap stunning ground images from rockets in flight.

The RC option may suffice for certain situations, too, though it comes with a set of drawbacks compared to kites and balloons. An experienced flier can have greater control and horizontal range with an remote-controlled toy (or hobbyist’s) vehicle compared to a kite. But an RC helicopter’s maximum altitude is only about 500ft (150m), less than half that of the EWB-USA team’s kite. RC also costs more: Helicopters can start at about $300 and range into the thousands. Also, RC vehicles can stay aloft for only 10 to 15 minutes before their batteries die. They do have a loyal following, however. For information, check out RCgroups.com, and DIYPhotography.com, which has tutorials on RC helicopters and planes.

Next: Sat images and 3D models

Now you’ve seen that aerial photography on a budget can be an excuse to play with toys. Check back later this week for Part Two, an outline of the powerful, free software tools available for stitching aerial photos together and rendering them into 3D models. We will also look at the free satellite images and other data available from NASA and USAID.

Leave a Reply

Join a global community of changemakers.

Become A Member