Suggested Articles
DHAN Biosand Filters
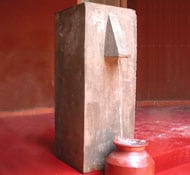
DHAN Biosand Filters are household sand filters developed by Canadian engineers promoted by DHAN Foundation. This household devices is build with local materials and filter water from wells,...
Please sign-up or login
DHAN Biosand Filters are household sand filters developed by Canadian engineers promoted by DHAN Foundation. This household devices is build with local materials and filter water from wells,...
Your best imagination be the best design
What prevents the hose from becoming clogged with sand?
Dylan Lunney at OHorizons answered your question by email. Here’s what he said:
“Thanks for your question! If you reference the Parts of the BioSand Filter image at the top of the article, you’ll see that there are two levels of gravel below the sand. The lowest level of the filter is filed with larger (6mm (1/4”) – 12mm (1/2”)) drainage gravel, on top of that is a layer of smaller (1mm (0.04”) – 6mm (1/4”)) separation gravel. This layer of separation gravel is small and compact enough that it prevents the sand that lays on top of it from passing through with the water.”
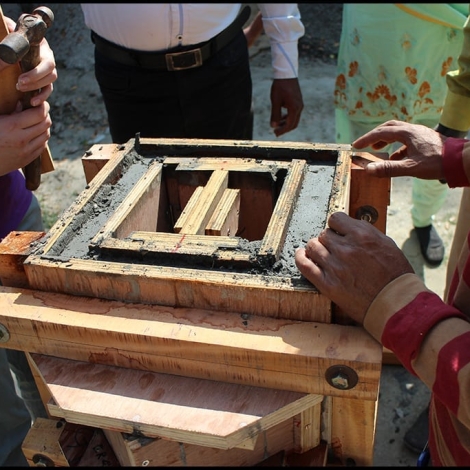
Too bad they did not talk to a carpenter before they designed their form. No REINFORCEMENT. I did not see them casting, but how is this concrete waterproofed?
To get many re-uses of plywood forms you need to keep somethings in mind. The faster you strip the longer your form will last. Plywood is PERMEABLE and is destroyed by the ALKALINITY of concrete. Even common oil based paint and primer will double the life of plywood, if you mix that paint with 2 part epoxy form life will be over 120 casts. The smoother the form, the less effort will be needed to strip, extending the form life by preventing stripping damage. If you make the inner form fully assembled and fixed you can use car body filler to make exposed edges smooth and make sure that concrete sand from leaks does not fill the ledges in the support structure of the form.
I noted them using linseed oil? cooking oil? as a release agent. Not nearly as good as 30% candles melted into diesel, applied with a rag.
Trying to strip plywood trapped on 3 sides is nearly impossible without damaging plywood SEVERELY. They might be able to strip 2 inner strips of the inside form, but getting that last 2 strips out would be hell. The problem can be mitigated my making the inside a slight TRAPEZOID, placing a 2X2 chamfered 3/4 on one side in every inner corner. The plywood abutting those 2X2s should not be cut at 90 degree but 85 degrees so that just the leading edge of the plywood touches the VERTICAL 2X2s. for single sheet at a time removal. You could just make the tube PERMANENTLY fixed if you built it like a 4 sided pyramid (with the top flat) but it would have to be stripped soon, I would suggest well under 2 hours after pour. keep the outside form on until the inside one is out, supporting the green concrete. If you made the bottom of the cast (top of the tank) a square ring perhaps 3″ deep you could drill the inner plywood at the top edge of the planned our, allowing a pry bar to be inserted and wedged over the outer form to lift the inner form free.
To reinforce the concrete, use 12 Gage wire and run it through holes drilled in the base. Bend the wire double and stick the doubled part through the hole and bend it over, then tie all wires off at the top of the pour over the bottom of the tank. I suggest 2 holes or 4 wires per side. monitor the placement of the wire as you place concrete making sure they are in the middle of the matrix. For horizontal “bars”, drop loops into the form as it is filled, positioning them with a stick, form/shape them in advance by wrapping them around the top of the assembled inner form before complete assembly.
The outside form uses bolts to blocks screwed to plywood. Bolts and concrete do not go together well as sand clogs threads, over tightening will soften screw connections and there are many parts that might be lost (washers and nuts). I would instead PERMANENTLY fix the horizontals and pre drill them so that a single 1/2″ pin of smooth rebar could be run down each corner. If you placed chamfer inside as stops it would also prevent leakage when the form expands. If you made the pin longer than the form a little you could make a “T” so that the pin could be wedged up and out. This also makes the horizontal braces (2X3?) perpendicular to the grain of the plywood allowing 1/2 not 3/4 ply.
Your spout support does not need a full top, as you can simply mix the concrete thicker and it will not overflow, or wait till it sets a little before completing the cast. This way there is no problem making sure that the shelf is filled completely. make a partial lid, fill and remove nearly IMMEDIATELY and trowel.
Lots of concrete water proofing agents, I used “Sahara” a cheap powder manufactured in Iran.
A quality steel form would cast perhaps 100,000 tanks, not 2. The advantages of a wood form are low cost, light, simple assembly using household tools and ease of repair. Wood is a lot less likely to be stolen for salvage/scrap as well. In the construction industry unprotected plywood forms are mostly limited to 6 casts, not 20.
If you had chamfered the outside corners you would not have had sandy corners and it would not have leaked.
I really liked you determining the design by what could be made by a single sheet of plywood.
I apologize for the caps used in the above post, i corrected typos with my spell checker and the result was all caps as drafts are in all caps and i could not tell until i posted my comments. I saw no way to edit a posted comment.
It is good.but why not use a plastic pipe which will save all the trouble of casting. BESIDES the weight would be less and removal of top layer of sand,after clogging, would be easy.
Hi Miftah,
There actually exist commercially sold plastic BioSand Filters manufactured in the US. An important difference between that approach and ours is the community empowerment and longevity/sustainability that comes along with having filters that are built using 100% local materials, tools, and labor.
Sustainability of water projects is a major issue. “It’s estimated that around 40 percent of water systems in developing countries become inoperable after five years.” If anything goes wrong with a filter during our projects, it can easily be fixed or replaced by the local organization running the project.
There are smaller comparative pros and cons to plastic versus concrete biosand filters, but we feel strongly that the impact of empowering others to have the capacity to run and maintain their own projects makes our approach special and sets it apart from traditional charity.
Excellent